Friday, August 16, 2013

Reversible Bag


It took me two hours to get the Kenmore running. No, there wasn't anything wrong with it. I just forgot to read the instructions. Good thing I have the manual. Apparently, in order to do a straight stitch on a 1703, you need a straight stitch foot AND a little straight stitch plate. Good thing I have all the attachments. Once I had the proper parts in place, it only took a little fiddling with the tension and she was good as gold!

The only problem I've found so far, is the bobbin winder mechanism doesn't work. A rubber part inside is old and crumbling. Not sure If I can find a replacement, but for now I just reach over to my Singer 404 for bobbin winding. It seems to work just fine, even though they're made for different class bobbins.

Once I got her up and running, I was DYING to to try her out. So off I dashed to Pinterest to pick an easy project from my overflowing sewing board. I settled on a free reversible bag pattern from verypurpleperson. I didn't want a huge bag, so I resized it to 80%. Perfect size.

Almost.

The handles turned out a bit short for my tastes. It fit me fine as a summer bag, but I despise a shoulder bag that's difficult to get over a winter coat. To lengthen the handles, I added 2 pieces of denim roughly 4-5 inches long to each strap. Turned out a bit too long.

Of course.

Pardon the amateur stitching. This was the last part, and I was ready to be done!

It's not bad. I probably could have gotten away with only 2-3 inches, but I think it turned out nicely. The denim is a cute contrast to the green and blue damask, plus it makes the strap a bit more durable. The inside is denim from an old pair of pants, and the damask has been hiding in my stash for over a year.

Now, I don't know about you, but I can't live with a bag that has no pockets. Purses are like black holes. If I don't put my cell phone in the pocket, I'll lose it for a week. It doesn't matter how many times I call that thing or move stuff around.

That's why my current phone is Ferrari red. Now I only lose it for 2-3 days. It's wonderful!


I didn't think too hard about the pocket. I just made sure the base was no wider than the darts, stitched the top, folded in the sides, and stitched it down. I did this before assembling the pieces, so all the stitching is hidden. Then, because I'm sick of fishing for pens (it's worse than my phone, I tell ya) I added a line of stitching about an inch or so from the side.

The main pocket is big enough to fit my checkbook, which I love! I didn't do a pocket on the other side, mostly because I was lazy and wanted this to be a 1 day project. I will be figuring out how to stitch a D-ring in there somewhere.

A few years ago, I started keeping my keys on a clip like this. I love, love love them. Hubby has his keys on a blue one, and mine are on red. Not only is it easier to figure out who's keys are who's, but I RARELY lose my keys anymore! I'll clip them on a belt loop while unloading groceries, or onto my purse straps (tucked inside the purse) while shopping. No more fumbling through a sea of receipts while your kids are screaming and your food is defrosting! The handles on my new bag are WAY too wide to clip on my keys, so I'm going to add a small D-ring inside. Seriously, this little detail makes life SO much easier!

The sewing bug has bitten me HARD, even though I have SO much to do. I'm actually supposed to crochet a bridal shrug for my sis-to-be by November! I would have started months ago, but the arthritis in my hands was awful. At this point in time, it's either suck it up or tell her I can't do it.

I'll probably suck it up.

But not before sewing a few more small items.

I'm thinking underoos...

Wednesday, July 24, 2013

A Sewing Machine Addiction


Hi, my name is Maria, and I'm addicted to old sewing machines.

 It started out innocent enough. I wanted to get into sewing, but didn't have the money for a new machine. One day, whilst perusing our local thrift store, I saw an old machine for only $5. I figured, what the heck, for five bucks I can teach myself to sew, and then someday when I have the money I can buy myself a better machine. This was my first hit.


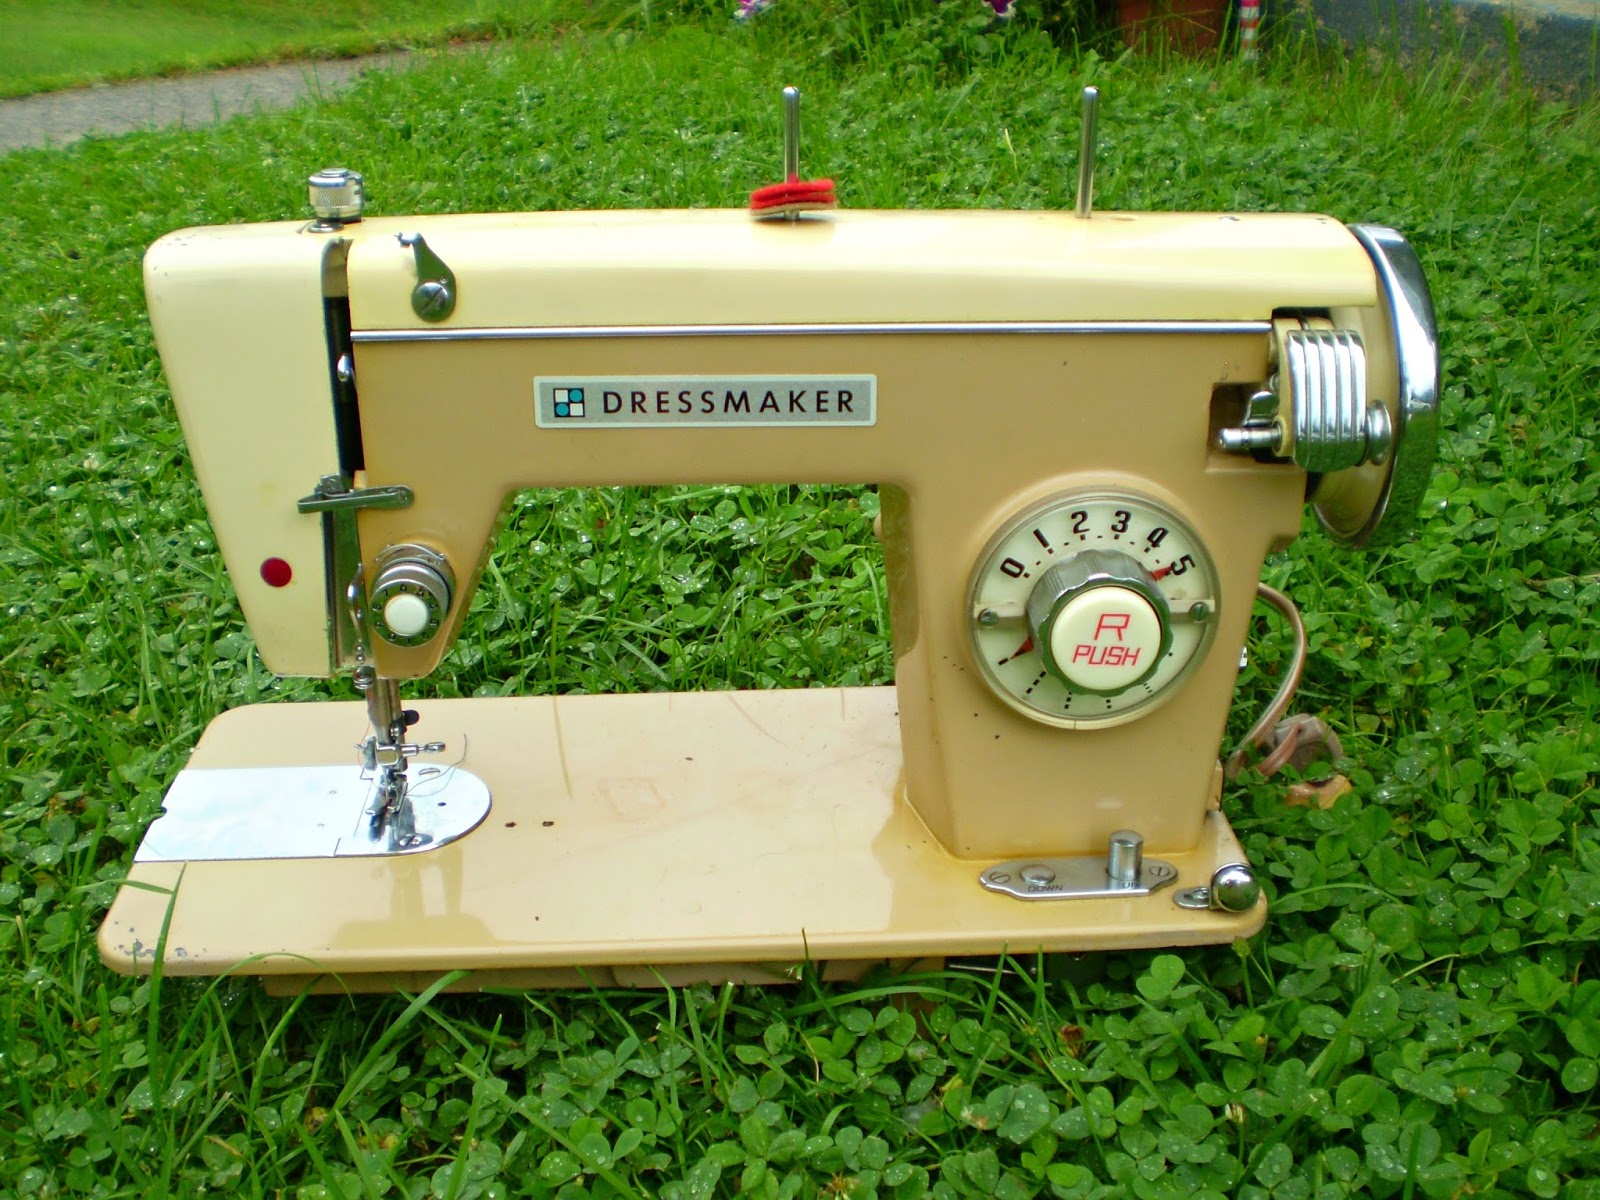
Well, that first five dollars taught me a lot. The first thing it taught me, was that there is such thing as a straight stitch only machine. Yep, it goes forwards and backwards. Straight line. That's it. Granted, you don't really need much more than that to sew most stuff, but it does prevent you from doing more complicated projects. I tinkered with the Dressmaker for a bit, but it just didn't seem to sew very nicely, so I decided to head back to the thrift sore and try my luck again. There had been a second machine there at the time I bought the Dressmaker. It had also been $5, but it was really, really dirty inside so I had passed it up. Boy, am I bummed that I did. It was a beautiful blue Morse. She looked kind of like this:

Image found at sewusa.com. Great site!
Gorgeous, isn't it? Unfortunately, she was gone. I wandered the outdoor furniture area for a bit, hoping to come across a consolation prize, when I noticed that the workers were unloading a truck full of new donations. There, out in front, was a beautiful old machine in a cabinet. My heart went pitter-patter. I casually floated by and looked her over.... I laid my hand on the flywheel and gazed at her beauty. I looked her over for a price sticker, but she must have been fresh off the truck. No price. I moved away, but she whispered to me again... twice more I wandered past, her soft voice beckoning me to stay with her. Finally, I couldn't resist any longer. I turned to one of the ladies unloading, a woman I knew to be a head honcho at the store. How much did they want for the machine and cabinet?

"Oh, you can take it. They never sell anyway."

I couldn't believe my ears! Really? I can just HAVE it? I tried to keep my cool as I walked back to my car. In reality, I could have skipped. I carefully loaded the whole thing into the back of my Bonneville and proceeded to drive as fast and yet a gently as I could back home. SHE WAS MINE! This is my first and greatest love, a Singer Slant-O-Matic 404 in her original cabinet:

Hello, sweetheart.

 It turns out that the 404 is also a straight stitch machine, BUT she is a force to be reckoned with! Made in 1959, this little lady was built to stitch through anything. I ended up having to buy a missing part, but once that new part was in she sewed smooth and quiet.


Ah, the day I brought her home! She needs a bath.
One of the greatest perks to buying an old Singer machine, is you can find TONS of information on them, much of it from Singer themselves. You can get manuals, parts schematics, even replacement parts for just about every Singer ever sold!

Slant-O-Matic or gangster lean, you decide.

As much as I adore my sweet, hardworking 404, that pesky straight stitch issue kept me on the lookout for a more versatile machine. A few months later, I happened upon this little lady.

The duct tape is from the case, which is broken.
 She's a Singer Stylist 457. All she does is straight and zig-zag, but I'm convinced that's all you really need to get by. This machine taught me a few more lessons. First, don't trust the staff when they say "yeah, it works." I got it home, went to try it out, and promptly shattered a plastic gear. A gear that is notorious for breaking, as I quickly learned. It took me a good six months before I got around to replacing the gear (surprisingly easy) and re-timing it (absolute pain in the butt). Second lesson, was always do a search on the model you are looking at. Old doesn't guarantee good, and it doesn't guarantee bad. (Look for quilting and sewing forums to read from people who collect and use old machines. This is where you'll get your best reviews.) Unfortunately, everything I read about the Stylist said that it was meant mostly for light-duty sewing. My few test runs have confirmed this. It just doesn't have the "oomf" that the 404 has.The third lesson I gleaned from this one, is that gears make the difference. Older machines, meaning -for the most part- before 1960, used all metal gears. The only belts, if there were any at all, attached the motor to the flywheel. That's it. Metal gears almost never wear out, and it takes a lot to slow them down.

Because it took me so long to fix the Stylist, I continued to keep my eye out for machines that might have even more stitches or power than my previous three. That's right, I'm up to three machines now. Next machine to catch my eye was this little thing and her cabinet, which we found at Goodwill. (I've developed an eagle eye for sewing cabinets, and nine times out of ten there's still an inhabitant tucked underneath. It's like treasure hunting.)


This is a Singer Touch & Sew 600E. First thing this machine taught me, is that I didn't learn my lesson with the Stylist. I should have gone home and done my research before plunking out $20. To date, she is the most expensive machine I've ever bought, and that's accounting for parts and repair. If you do half a minute of research, you'll see that this is a notoriously troublesome machine. It's not that she isn't good quality. The gears are all metal and she can do a wide variety of stitches without cams. However, the bobbin winding system is a train wreck. Some T&S machines apparently worked very well, but this is one of the ones that didn't. I tinkered with this thing on and off for months. No matter what I tried, I couldn't get her to sew properly. Then, when I was giving it one final attempt last February, I accidentally broke a screw thread. You know, the one the online tutorials said that YOU SHOULD NOT UNDER ANY CIRCUMSTANCE BREAK BECAUSE IT'S A UNIQUE SIZE AND CAN'T BE REPLACED!

Well, nuts.

Good thing the cabinet is gorgeous and worth the $20 by itself.

Oh, and in the meantime, I happened to inherit Hubby's grandmother's sewing machine.

Easily the heaviest machine in my collection.

An Elgin 2468, built in 1958 by Viking. She's beautiful and built like a TANK, but unfortunately they never found the cams while cleaning out Grandma's house. (cams, by the way, are little discs that allowed machines to make special stitch patterns. Many machines can barely do a straight stitch without their cams.) This was heartbreaking, but I plan to keep my eye out for a set on ebay. I'm not holding my breath, however. This model seems to be incredibly rare. Heck, even Google has barely heard of it.

In case you're wondering, this now puts me at five sewing machines. I'm not done yet...

At this point, I decided I really need to stop buying machines, at least until I unload some of the old ones. I was doing a good job of keeping my hands in my pockets, until a friend on Facebook said she needed to get rid of an old treadle sewing machine, and would anyone be interested? Um, yes. Yes I would. We had just traded my Bonneville for a Grand Caravan, and what better way to christen all that cargo space, than with a treadle sewing machine!


This is a Singer 27, made sometime around 1904! The decorative pattern is called Gingerbread or Tiffany's, I've heard it both ways. (NO YOU HAVEN'T, SHAWN!) The cabinet has six drawers, which puts it at the top of the line in its day. Both the machine and the cabinet are in rough shape, but with a little (ok, a lot) of TLC, I know I can get it up and running again. Until then, the cabinet is stashed in the basement where my boys can't destroy it further, and the machine is in my sewing area, where I can ogle it every day.


Gorgeous details everywhere!

Again, I told myself NO MORE MACHINES. I tried to get rid of a few via Facebook, but no takers. I had the Dressmaker and the Stylist up and running, but no one wanted an old machine. So, for now, here they sit. (I actually have a plan for them now. Stay tuned!)

And so, a few more months passed by, and my mind wandered away from sewing machines and back towards gardening and preserving. Funny how the cycle of the seasons moves you in and out of your various projects and hobbies. I really hadn't thought about it much until last week, when the fam and I were once again wandering around our favorite thrift store. Spotting two sewing cabinets at 100 yards (give or take) I decided to take a peek under the lid, for curiosity's sake. The first one was a lousy looking Singer from the '60s. The next one was in possibly the ugliest cabinet I had seen to date. Awful '70s wicker drawer fronts, but even worse, the "wicker" was plastic! Oh, Lordy. I popped it open, and found an interesting Kenmore machine. Nothing special, so far as I could tell, although she was in good condition (I need to start bringing smal screwdrivers with me to thrift stores.) Then I noticed there was a full-size drawer in the cabinet. Usually it's just a little secret compartment that fits scissors and about 8 pins. I pulled the drawer open... and started to geek out. It was full, and I mean FULL of sewing junk. Buttons, ribbon, thread, the manual, and TWO boxes of original attachments! One included several presser feet and a buttonholer, while the other one held a full set of cams!

You would be proud of me. I didn't buy the machine. It was $15 for everything, and while I knew I could make that much just selling the cam set, I decided to be smart and not buy a SEVENTH sewing machine. And so, a few days went by. I just could not get that drawer of goodies out of my mind. There was no way I was going to spend $15 on another machine without a darn good excuse, so I came up with one. "What if the cams fit the Elgin? I mean, if they don't fit I can just sell them and make my money back, but what if they DID?"

I'd like to take a moment here to say that I have an amazingly patient and supportive husband. Not only does he not mind my tomfoolery, he often encourages me. With his blessing, I skipped off to see if the Kenmore cabinet was still there.

It was.

This is my seventh and FINAL machine! (to date...)

Window back lighting is a pain.
 This is a Sears Kenmore 1703, top of the line in her day, and she has all the bells and whistles. Built in stretch stitches, built in edging stitches (no need for a serger!), and the ability to chain stitch.

Bottom drawer is removable and has legs! The only redeeming feature.
I think she only had one other owner, and that person wasn't much of a sewer. Many of the attachements are in their original packaging!


I still haven't had a chance to sew with her yet, as I'm moving my sewing space from a heaped corner in my bedroom to our overstuffed office/man cave. It's remarkable how well we've fit everything in. I don't anticipate a problem with getting the Kenmore to sew, however. She's in immaculate condition inside and out. Not a speck of dust!

Well, there you have it. The long, babbling account of how a girl who couldn't afford one new machine ended up with seven old ones! In addition, I have four sewing cabinets and the treadle. My total investment at this point, including parts I replaced, comes to about $72. In the next few weeks, I plan on trying to recoup some of that money, and in the process downsize my collection.

I don't regret any of my purchases. I learned a lot from each one, and the challenge of trying to repair them taught me a new skill. I found that I enjoy repairing machines almost as much as I enjoy sewing with them! I don't yet have experience with the motor and electrical work, but I know that will come in time. I am addicted to these machines for life!

Saturday, July 20, 2013

Canning Fever: it begins....


Is it just me, or did June fly by REAL fast? Not to mention, we're halfway through July already! What's up with that? June has been hectic, and July is only going to be more hectic-er (it's a real word if I say it is).

I've been bit by the canning bug. It started innocent enough... I noticed that blueberries were on sale for a dollar a pint, and of course that means it's time to make jam! If you remember, thanks to the evils of corn, I can't touch any of my precious jams from last year.So, armed with a corn-free pectin and 24 (yes, that's twenty four) pints of blueberries, I started canning. Then I made strawberry jam. But I have to give it away because I started reacting to the strawberries. They must have been sprayed with something corn-based. All 16 pounds... Well, at least Christmas gifts are already figured out!

This year, I'm testing out two new-to-me canning products: Pomona's pectin and Tattler reusable lids. I've worked with Pomona's a few times so far, and there seems to be a learning curve to it. I'm not always getting a full set, and I'm not quite sure why. I don't mind too much. It's still the best damn fruit syrup you can find! I'm going to keep fiddling with Pomona's until I get it right.

The Tattlers I will probably test out tonight on some pickles and peaches. Fingers crossed!

Last year I dipped my toe into this canning business for the first time. This year I have a pretty extensive plan for canning. Jams and pickles are nice, but I want to be able to put up at least a portion of our meals for the coming year. Easier said than done, when you don't have a pressure canner. I'm strictly relegated (officially speaking) to high-acid foods. It has taken some ceativity to not only find recipes I can make, but ones we will happily use on a regular basis.

Enter: Harvard beets. What are Harvard beets? A  lovely sweet/sour side dish that is a breeze to make. I made them last year using store bought canned beets and making the sauce from scratch. But, as I looked at the recipe, I realized it was remarkably similar to the recipes for canned pickled beets, but with minor changes and on a smaller scale.

Well, thought I, why couldn't I do this with pickled beets I make myself? Imagine taking a jar of pickled beets, draining the liquid, adding it to a saucepan with some spices (if your beets weren't spiced to begin with) and flour/cornstarch/what have you. Cook til thick, add the beets back in, warm them up, and ta da! Your veggie side dish is done!This was an exciting revelation, because it allowed me to take "pickled" foods and make them palatable enough to eat in larger, side-dish portions.

I currently have a 25 pound bag of carrots that will pickled up the same ways as the beets. Think that sounds weird? Look up recipes for carrot "copper pennies." It's an old dish made very much like Harvard beets. Again, I tried this dish with the family to make sure they liked sweet/sour carrots. The dish was received with rave reviews. Woohoo!

Many, many things on my canning wishlist for this year:
Pickled beets
Pickled carrots
Blueberry jam DONE
Strawberry-kiwi jam DONE :(
Sliced peaches in honey syrup
Whole blueberries in syrup
Plum halves in honey syrup
Zucchini in pineapple juice (supposed to taste like and be used just like pineapple!)
Candied jalapenos
Salsa
Tomato sauce
Whole tomatoes
Garlic-dill pickles
Applesauce
Apples in syrup
Apple peel jelly
Beet jelly
Chow chow
Plus more that I either can't remember or I haven't  made up my mind on...

And this is just the canning list! I also plan to start utilizing my chest freezer better. I have five basil plants that need to become a boatload of pesto. Yum.

Sunday, April 14, 2013

Harbingers of Spring and Violet Syrup


La Violette de Mars, otherwise known as the Common Violet.
SPRING! Spring spring spring! Have I mentioned how excited I am about SPRING? Yes? Well then, I'll only mention it once more... SPRING!!!

The world is only just turning green here, a full month later than last year. One of the plants I am watching for are the sweet little violets that blanket my backyard every spring. Last year they were even more robust than usual. As is my tendency when I find a resource in abundance, I soon began wondering how I could take advantage of nature's bounty. The first thing to pop up, and the only thing I had an opportunity to try, was violet syrup. Not only is this unique floral syrup a treat for your tea or pancakes, but it can also be helpful for coughs and other medicinal needs. As a matter of fact, the leaves are also medicinally useful, but that's a post for another day. For now, check out this post on Common Sense Homesteading for a good rundown. One of my latest passions is herbal medicine, so you will certainly be seeing more about it in the coming months.


The violet syrup was easy enough to make. I followed the recipe on Life's a Lasagna, with some minor alterations. First, I had to gather about 4 cups of blossoms. Yes, this takes forever, but on a beautiful spring day I'll jump at the chance to sit in the sunshine for an hour. I packed all the blossoms in a quart canning jar, poured 2 cups of boiling water over top, then let it sit to steep overnight. What happens next is... downright magical. The color from the petals quickly seeps out, and the water will turn the most unbelievably gorgeous blue that I have ever seen. I wish I had gotten a picture, but I was feeling sick that day and forgot.

In fact, I ended up coming down with a 104*F fever that lasted a full five days. Instead of steeping overnight, my blossoms steeped for a week. Thankfully, I'd had the forethought to stick the jar in the fridge after the first day. After such a long steep, the brilliant blue had changed to a deep, DEEP amethyst. So beautiful!

Now, this next step is where I differed from Ms. Lasagna's recipe. You see, the brilliant color of the violets is very sensitive to heat and changes in ph. Both the heating of the liquid and the lemon juice called for in many recipes turns the brilliant blue (or purple, in my case) to a vibrant fuchisa pink. While beautiful in it's own right, I much preferred the color I started with. So, this is what I decided to do. First, I ditched the lemon juice. It's only there to add a touch of flavor and acidify it for canning (which I didn't do, I froze it), and it's the acidity more than anything that changes the color.

Look at that color!
Next, I decided to heat my syrup double-boiler style. I set my 4 cup glass measuring cup in a pan of water, poured the strained violet water into the measuring cup, and added 2 cups of white sugar (any other sugar would probably overpower the delicate violet flavor, but any sugar will work). I initially used the double boiler so it would be easier to pour the syrup into bottles, but a fortunate side effect was that I was able to gently heat the syrup just until all the sugar dissolved. Much to my delight, this process preserved every bit of the amethyst color!

It actually looks more like the above picture, but I love the color in this shot!

 I then decanted my springtime treasure into bottles and stuck most in the freezer. Sadly, I think I still have two down there. I really didn't use the syrup much, but then I really didn't know HOW to use it.That's not the case anymore, as I have expanded my knowledge of edible and medicinal plants. I'm contemplating trying to make violet candy this year, or possibly violet jelly. Either way, the coming onslaught of nature's jewels will only increase my excitement for spring!


Friday, April 12, 2013

SPRING IS HERE!

Spring in my kitchen window! (Please ignore the filthy glass. Thank you.)
Oh, baby! The weather has finally warmed up, the world is starting to turn green again, and I feel GREAT!

Well, ok, I feel emotionally great, which is a pretty big deal. I don't know if it's all the vitamin D my skin has been soaking up this past week, but I just plain feel POSITIVE about life! My hormones were FAR more stable last month (NO PMS!) and last week we met with our soon-to-be next door neighbors. I'm so excited for them to move in at the end of the month! They have two little boys the same age as my goobs, and I foresee a little Lucy & Ethel style shenanigans in my own future...

I've also been able to get started on the garden. If you remember my tomato debacle last summer, you know that I have to break new ground in order to grow anything this year. In addition, my new eating habits have me buying GOBS of fresh vegetables. This is putting a huge strain on the food budget, so I'm hoping to ease that by growing some of my own.

There's another reason I'm growing my own veg this year. Over the last few weeks, I have come to realize that I am ridiculously sensitive to even minute traces of corn. The slightest amount causes joint inflammation, disorientation, headaches, and exhaustion.

My Arch-Nemesis... dang, that looks delicious.

If you think dairy and gluten are tough to avoid, wait til you try cutting out ALL corn. It's in EVERYTHING! Modified food starch, dextrose, citric acid... all of these ingredients are most likely derived from corn. Citric acid was an especially frustrating, although enlightening, find. I've known for a while that Hunt's Garlic & Herb tomato sauce affected me, but couldn't figure out why. The ingredients all looked clean. I started avoiding it and cooking with plain diced tomatoes or tomato sauce. Much to my confusion, I was STILL reacting to foods. Finally, two weeks ago, I realized that the ONE common ingredient (besides tomatoes, duh) was citric acid. Although it can come from other sources, in America it's typically made from corn! Since then I have scoured store shelves for a citric acid-free canned tomato product. Nothing. Even the organic brands boast a "naturally derived" citric acid, but I hardly trust that vague distinction. Looks like I'm going to have to can my own tomatoes in order to have a product I can trust.

As of that wasn't a big enough kick in the stones, just last week I found another product I can't have. I was getting a pretty big headache one day, despite eating nothing but pbj on grain free bread. The bread? Totally safe, I made it from scratch. Peanut butter? I only buy Krema brand, which has one ingredient. Jelly? It was my homemade apple peel jelly (still one of my favorites!). Let's see, the jelly had apple peels, tap water, white sugar, a small amount of spices and... pectin. Uh, oh. I checked a box of pectin, and sure enough, the first ingredient was dextrose, a corn-derived sugar. All those jellies and jams I canned up last summer? Can't have them. At all. After all the love and effort that went into them, this was seriously depressing. Thank GOD I also have apple butter, which does not contain pectin. It has become my one sweet treat.

Now, I know there are people who might be saying, "come on, the amount of corn that would actually be in an entire batch of jelly, never mind a jar, never mind a sandwich, can't possibly be affecting you!" If you're saying that, you're in good company, because even my dear, supportive Hubby is having trouble grasping just how sensitive I am. Some days, I worry that I look like a hypochondriac, even though there is no denying the physical effects I feel. I have eaten foods without carefully reading labels, and just by how I felt 15 minutes later I could tell you there was something in it I can't have. So, doubt me if you like, I would certainly do the same in your shoes, but my body is shouting loud and clear to lose ALL corn products.

There's always an up side!

On to more positive news, my sudden burst of positivity (and a clean kitchen) has me finally tackling the problem of an adequate diet. Cooking 100% grain and dairy free is a real challenge, especially when you have a normal-eating husband and two kids to feed as well. Virtually everything that passes my lips has to be made from scratch, and I'm even picky about what brand of chicken I buy. (many are injected with "broth" to enhance flavor, but there's no telling what's in the broth. My biggest question is, how lousy does the meat taste that you have to inject flavor?!) I am tinkering with quite a few recipes, and when I finally get the results I'm looking for I will be sharing them here. I'm also completely out of the habit of menu planning, and want to get back in to that.

Speaking of planning, I am also working on getting my household binder back up and running. I developed a pretty good system that, potentially, could work very well for me. It's going to take some effort, because my schedule is going to get very busy very soon. AC will finally be getting in to speech therapy, starting next week! I can't wait! Although he's much better than he was a year ago, he could still use the help. What I'm NOT looking forward to is the drive. Twice a week, an hour away. Yuck. I did find out that there's a Whole Foods very close to the therapy building, and since I've never been to one I think I'll be making a stop after AC's appointment. Mommy needs field trips, too!

Ok, enough chatter for today. Maybe next post I will get around to showing you my progress in the garden. To save money I am tilling up the whole thing by HAND! Not an easy task, but I am actually enjoying the exercise! I love SPRING!

Thursday, February 28, 2013

Goodbye, Rooster Sauce

Oh, you wicked rooster, why do you hate me? photo credit
Whoops! February got away from me. I suppose I should check in on my dairy/grain free attempt. I've actually spent the last week with a head cold, which is making this whole "pay attention to your health" thing rather difficult. If my spelling or grammar is erratic, this is why. I no think good right now.

So far, I have learned that there are far more things I am sensitive to than i realized! In fact, I'm struggling to be sure that even ruling out grain and dairy is enough. I've had more down days than up these past few weeks, but the two truly good days I had were enough for me to realize how much I am affected on a daily basis. I'm pretty sure I have an issue with corn, and I'm 90% sure (but not willing to test the 10%) that I have a strong reaction to xanthan gum (which, if you didn't know, is derived from corn).

What kind of reaction? In short, I get a little stoned. Yes, you read that right. The longer I pay attention to my diet and my body, the more I have been able to identify my symptoms. The two times I had xanthan gum recently, within half an hour I became extremely tired and slightly disoriented. My eyes were heavy and I often had to blink to get them to re-focus. After thinking about it, this is what I feel like nearly every single day! I  am perpetually struggling to think clearly and linearly, to the point that most days I can only attend to the boys' basic needs. There have been far too many times in the past year when I was out driving and felt slightly... un-focused, I guess. It's hard to describe. I never understood why, it's not like I drink or have any other issue that would cause impairment. Prior tests said there was nothing wrong with my blood pressure or blood sugar, so I could rule that out. There was never an instance where I thought I was unable to handle the vehicle or navigate traffic, so I never worried for my safety. But still, I could tell I was not fully "aware," if you will.

Being able to attribute this to a food reaction has really opened my eyes (pun intended) to how careful I need to be with my food intake. The second time I accidentally ate xanthan gum, I found it at the bottom of the list of ingredients on my beloved Rooster Sauce! And I had only eaten MAYBE a teaspoon TOPS. Whether I am simply more sensitive to the xanthan form of corn or all corn, I don't know. Clearly, I will need to make sure even minute traces are out of my diet if I hope to see improvement.

Has all this diet fuss been worth it? Yes and no(ish). Because I seem to react to each food differently, I would never be able to identify them all without peeling back each layer one at a time. My only frustration is that I did NOT get that three-day turnaround that I got last time I went gluten free. In fact, every day seems to be a roller coaster of clear moments and pure exhaustion. As careful as I have tried to be, I will still find myself reacting to meals that should be safe, and what's worse, I don't know which of the 5+ ingredients are the culprit!

I'm starting to think an elimination diet would be worth the frustration. I've contemplated an elimination diet before, in fact GAPS Intro is very much like an elimination diet. Each time I have considered it, I have always talked myself out of it, and I know why. It has been so complicated, expensive, and isolating to cut out grains and dairy, that I absolutely DREAD cutting out any more foods. It's all I can do to feed myself right now, but to take more of my building blocks away would be devastating! What if it's coconut? Or tapioca starch! (my go-to grain sub right now) Or worse, what if I lose eggs????

I know, I know. The truth is, whether I know that a food upsets me or not doesn't change the fact that it is affecting my health. It simply pushes me to act accordingly if I want to be healthy. And that's what it all comes down to. Do I want to FINALLY be healthy, energetic, clear-headed, and HAPPY? YES!!! A million times, yes! Well then, Maria, you are going to have to accept the difficult task of MAKING IT HAPPEN. Nothing good can come without sacrifice.

Monday, January 7, 2013

Resolutions or Goals?


Ah, the ever popular "New Year's Resolution" post! I read another blogger recently who said she preferred "goals" over "resolutions." After thinking about it, I heartily agree with her. Resolutions are concrete, unshakeable decisions that MUST happen in their entirety to be considered a success (government being a notable exception-in-denial).

On the other hand, a goal is something that you have chosen to move toward in the coming year. It is something you want and have chosen to pursue. Your year can be seen as a success so long as you have actively PURSUED your goal. If you achieve it, hooray for you! But life was not designed to function within 1 year increments. If your "resolution" is to lose 50 lbs and you only lose thirty, you failed your resolution. Those hard-fought 30 lbs are inadequate, because you failed in your "resolve." BUT, if your GOAL is to lose 50 and you make it to 30, then you have made terrific progress!

Yes, many people see success in what they accomplished, but they still know that their resolution was unfulfilled. Despite the concreteness of their resolve in January, by November they have redefined the word "resolution" to mean: "a good idea I had while drinking champagne and wearing a party hat."

Perhaps this is just semantics, but I also see it as realism. I KNOW I'm not going to be perfect at maintaining house this year, much less this month. I want to strive for it, but why put the unneeded pressure on myself to achieve perfection? I will become frustrated and angry as I fight against my flaws. I am an imperfect being. But, the greatest mark of a person is to always yearn for and seek out perfection.

Some people reject the idea of a New Year resolution BECAUSE they fail every year. I think this is very unfortunate. Humans love nothing more than to chase after something. However, many people give up chasing because they are already convinced they will fail. We cannot grow if we never risk failure.

I want to be MORE than what I am, and yet I also know that I fail daily. How can I overcome this? One way is to focus not just on the end goal, but on the CHASE! Part of the thrill of love is to pursue your beloved. If we embraced our yearly goals the same way, we could see ourselves grow in incredible ways! We would learn the lessons of perseverance, patience, determination, ingenuity, humility, and many more. Each lesson refines us from WITHIN, and each one gives us the strength and skill to continue. I may not keep a perfect house by next January, but I pray that I will be at least one step closer. And really, isn't being one step closer better than never even trying?

In short, I think that calling it a resolution is to say: "I WILL achieve you!" However when I have a goal, I say: "I want you, and I'm willing to pursue you for as long as it takes to finally embrace you!" Doesn't that sound far more attainable, not to mention happier, than the resolution? Despite acknowledging that we will frequently struggle, we embrace the challenge with passion! It is no longer a fight, but a dance!

And now, I am off to make myself a small list of GOALS for this coming year. Well, perhaps I'll make it after I clean something. It can be one of the things I get to cross off the list as soon as I write it down. I love those.

Tuesday, January 1, 2013

A Plan to Can

Pretty Jars!

Whew, the last year went by fast! Now that I've come full circle since first starting my foray into canning, I decided to make a list of what I want to do again and what I'd like to try in 2013. For posterity's sake, I'll aslo list what I won't be making again.

Make Again 
Apple peel jelly - The more I taste this stuff, the more I love it. AC likes it too! It's currently his most requested jelly! Plus, you really can't beat the fact that this is basically a bonus from canning applesauce! Great everyday jelly, could easily replace strawberry. 

Applesauce - so good, and relatively simple once you're done chopping those dang apples. 

Spiced Blueberry Jam - oh lawdy, this stuff is amazing! Absolutely dreamy on toast or pancakes.

Maybe Make
Apple butter - This stuff is really good, but I don't see much need for it if I'm making applesauce and jelly.

Apple slices in syrup - Since I just made this, i have no idea what my usage will be. I'm not ruling it out until I know for sure.

Balsamic Blackberry Basil Jelly - Really a gourmet treat! But I only need so many preserves.

Balsamic Pickled Asparagus - This is probably the only non-sweet pickle I've ever enjoyed, but that last jar sat on the shelf for months.

Strawberry Jam - Always a classic, but again, a gal only needs so many jars of preserves.

Not Making Again
Blackberry syrup - I am still up to my ears in syrup. It makes a nice soda, but we don't use more than a small batch per year. I'm set for a long time!

Cranberry Grapefruit Marmalade - It's not that it was bad, I just didn't use it. I haven't opened a single jar. While I know what to do with cranberries, I don't know what to do with cranberries that taste predominantly of grapefruit.

Honey Lemon Marmalade - Again, I never used a jar. I finally opened one recently, but found it slightly bitter. IF I try this again, It will be as a jelly and not a marmalade. I just can't get used to tough bits of rind.


New to Try
Beets - I've discovered a deep love of beets, and since it's an easy crop to grow I figured it would be a no-brainer to try and can. I'll probably start with pickled beets, and if I can find someone to loan me a pressure canner I'll move on to plain sliced beets. Yum.

Beans - We also discovered that green beans no longer upset Hubby's Crohns like it used to. I am beyond THRILLED to add a new veggie into our diets, especially since it's another one that's easy to grow. I'll probably only can this if I find a pressure canner, but I'm not ruling out Dilly Beans!

Carrots- Again, this depends on a pressure canner. I may not grow the carrots myself, considering I can buy organic carrots for a reasonable price. I like having shelf stable veggies, but am leery of metal cans.

Cranberry sauce - I've been stashing cranberries in my freezer since Thanksgiving, and when I find the time I want to make some plain-Jane cranberry sauce. I love the stuff in pork dishes, but store bought sauce always has HFCS.

Tomato sauce - Yes, I know, it's absurd that i didn't try sauce this past year, but between that dang blight and complete disorganization at harvest season, I didn't. In fact, I had originally wanted to make salsa. Sauce, however, would be much simpler, and therefore more likely to be put up.

Herb jellies or syrups - I made violet syrup last spring and found it fascinating. I'd love to try it as jelly! I also want to try dandelion jelly/syrup, which is supposed to taste like honey. I'm sure there are more wild plants I can play with, but I'll start with these in spring.
____________________

Hmmm... I think that's everything. Did I miss anything awesome? Especially something that can be used as a side dish in a meal. That would certainly do more for our food budget than a lifetime supply of jelly. I'll have to modify this list as I refine my plans for the year. Still planning that garden.

Oh! Something I also want to experiment with this year is Pomona's pectin. I've heard lots of good things about this, most notably that you can use little to no sugar and still have perfectly set jelly. Many times I've made jelly and absolutely HATED putting the last 3-4 cups of sugar in! Sometimes, nature did it right the first time 'round! What really convinced me to try Pomona's was when I learned that it lasts indefinitely. That's right, NO expiration! The traditional SureJell or Certo stuff only lasts a few months. I like keeping a few boxes of pectin on had for impromptu jellin', but there's nothing more frustrating than preparing to can only to realize your pectin is past due! Also, Pomona's can make larger batches and more batches per box. This not only makes the price comparable to other brands, but I no longer have to work some kitchen gymnastics in order to can more than 6 jars of jelly at a go! Definitely on my 2013 Must Try List!

Thursday, December 20, 2012

Apple Canning Recap - with Pictures!


I'm finally getting the last of my apples put up. Thank goodness apples keep so well! I must say, I'm very pleased with the yield I've gotten from only 1.5 bushels. Soon after finishing the apple butter, my lovely local apple source had a bushel of less-than-perfect apples for only $14! These apples were just old enough to not enjoy fresh, but they were perfect for canning. I used half the bushel for sliced apples in light syrup and the other half for applesauce.

Then, I discovered a recipe for apple peel jelly, made from all those peels and cores. You know I made it. I hate throwing something away if it has potential value, no matter how many jars of jelly are currently chillin' in my basement. I have to say, I was surprised how much apple flavor was in those peels. It was a delicious, complex, almost floral kind of fruity flavor. Certainly worth making for an everyday jelly. I still have about 3 cups of apple peel juice left, and I'm thinking of making it into a cordial. Or I'll just drink it.

And so, in the interest of remembering all of this a year from now, here's the breakdown of my apple canning extravaganza!

Apple Butter
Used: 1/2 bushel plus some. Maybe closer to 3/4 bushel.
Yield: 21 half-pints
Left skins on, added cinnamon, cloves ginger, allspice, SMALL amount of cardamom.
NOTES: Very good, very easy.  Will see how well I use it up, but will likely make again.


Apples in Extra Light Syrup
Used: 1/2 bushel, less maybe 3-4lbs
Yield: 11 pints
Apples were overripe and cooked up a bit too mushy for pies.
Used extra-light syrup and followed Ball Book instructions. Good level of sweet.
1 batch of syrup filled all jars, added cinnamon, cloves, ginger, allspice, and a bit of vanilla extract.
Lots of siphoning. Perhaps too little head space or poorly packed. Lost majority of syrup.

All but one sealed properly.
Preferred heating slices in syrup just until they started to shrink but not cooked through.
 (Notice top row in picture. Left three were par-cooked, right two were fully cooked.)
NOTES: We'll see how I use the jars, but this was a pain to make for such mediocre results. May not make again.


Applesauce
Used: 1/2 bushel (slightly less. some went bad)
Yield: 4 quarts
Added 1c brown sugar, cinnamon, allspice, cloves, ginger
Also 4 small Meyer lemons
Left texture quite chunky.
All sealed.
NOTES: Delicious, will make again! Almost too tart for me, but Hubby loves it. Ran out of brown sugar or I might have added more. I certainly see this getting used regularly. It's delicious hot; good enough for dessert! Only problem is, to last a year I would have to make at least 12 quarts, preferably twice as much.

Jelly isn't nearly this orange. More a rosy peach/pink.

Apple Peel Jelly
Used: 1 bushel (ish) peels and cores
Water Used: 7 + 10 = 17 (made in two batches)
Juice Yield: 15 cups
Added very modest amounts cinnamon, cloves ginger, allspice while simmering peel.
Squeezed as much liquid out of peels as possible. Juice is cloudy but I don't care.
Used low sugar SureJell. 6c juice to 3c sugar. Not sure it's going to fully set up. Time will tell.
Update: It seems to be jelling just barely enough. Next year I'm trying Pomona's.
Very sweet. Almost overpowers delicate apple flavor.
All sealed!
12c juice yielded 12 half-pints. I must have boiled it down too much. It took forever to boil.
NOTES: While this isn't a smack-yo-mama jelly like my blueberry jam, it's still very good. Would certainly make a good everyday jelly, if I can ever wean AC off his strawberry bias. Color of peels determined color of juice.

This brings my total jar count to:
  • 21 jars apple butter
  • 11 pints apples slices
  • 4 quarts applesauce
  • 12 jars apple jelly

Phew! I think that's enough apple for one year! Just a few more projects on my list, and I think I can finally put down my ladle until next spring. I look forward to recapping everything I've made and making a plan for next year. Someone has offered to let me borrow their pressure canner, so my plans already include a few garden rows of beets and green beans. Finally, I'll be able to put up something that isn't sweet or pickled! Sad how excited I am about that.

Sunday, November 18, 2012

Apple Butter, a.k.a. the easiest stuff to can, EVER!

Ah, fall! The leaves have long since left our trees, but there are still oodles of autumn produce to be had. I have been buying apples by the half bushel from a sweet gal who sold at the farmer's market over the summer. She joined up with my awesome grassfed meat source, and now they both deliver bi-weekly a few miles from my house. You really can't top the convenience, especially this time of year! These apples are good eatin'! They are grown locally with a minimum of pesticides, and you can taste the difference right on the skin. Store bought apples have such a bitterness to their skins, but my farm apples aren't bitter in the least.

Now, a half bushel is a huge amount of apples, especially when a lot of them are on the smaller side. I couldn't refrigerate them if I wanted to. At first this wasn't a problem. My boys go through apples like crazy. They could polish off a 3lb bag of apples in three or four days, tops. Bulk was not only more convenient, but cheaper! Is it just me, or have there not been any major apple sales this year? I don't recall pears going on sale when they were in season, either. Stupid inflation.

Where was I? Oh yeah, bulk apples. (count yourself lucky, I almost went on a political/economic rant right there) The first half bushel of apples, my boys were in heaven. I left the box on my kitchen floor and they were able to help themselves throughout the day. Two weeks later, they had just about finished the box when I picked up the next half bushel. This time, they slowed way down. I think they're suffering from apple burnout. After a week, the apples began to bruise, which dramatically increased the rejection rate. AC does not dig blemishes on fruit. At all. If his banana has the slightest brown on it, I have to hand it to him strategically so he can't see the spot before he eats it. Parenting is all about strategy and outwitting the other side. Or is that in battle? Eh, same thing.

That's right, I said bedtime.
What is a gal to do with half a box of bruised apples? Well, can them, of course! I immediately hopped on pinterest (better than google in my world) and started searching for different ideas. BAM, it hit me. Apple butter. But not just apple butter, apple butter made in the CROCK POT! I absolutely LOVE apple butter, but the store bought stuff is guaranteed to be laced with high fructose corn syrup. Where's the fun in that?

Let me tell you, apple butter in the crockpot is so rediculously easy, and so dadgum DELICIOUS, that I immediately had to make more. I promptly ordered another half bushel, and even told them they could include imperfect and bruised apples. It really doesn't matter with apple butter, and I figured it helped them unload produce they might have been stuck with otherwise.

I'm writing down what I did mostly to remind myself for next year. If you want a more formal recipe, this one at pickyourown.org is really informative. This is a great project to start in the evening after kids go to sleep.

I started by slicing as many apples as would fit in two of my crockpots. (5qt and 7qt) The apples shrink a lot as they cook down, so I decided to cook down two crocks, then combine them when it came time to can them up. I left the skins on my apples, both for nutrition and bulk, but if you insist on a perfectly smooth apple butter, I'd recommend cutting them off. My stick blender couldn't get every last piece, although it is mostly smooth.

Then, I topped each crock with 1/4 cup sugar (next time I use brown sugar), cinnamon, cloves, allspice, ginger, and a wee bit of cardamom. All spices were eyeballed, because I can't be bothered to measure them. I add the initial sugar to help draw out moisture from the apples. There is absolutely no need for additional liquids when I cook them like this. Fewer liquids = less simmering time. I opted for fresh ginger over dried, simply because I LOVE fresh ginger and I always have some on hand. I'll save the ground ginger for gingerbread. Oh, gingerbread... now I'm hungry.

Stay on target, Maria, stay on target.

I am now envisioning myself flying across the surface of the Death Star.

I think I'm off target.

Ahem...
GINGER. I was talking about ginger. Be forewarned, if you use fresh ginger, it will not break down while cooking and the stick blender won't catch it. I happen to love bits of fresh ginger. Others (Hubby included) don't. Your call. Unless I'm doing the cooking, then it's my call. Sorry, Hubby.

Once all the spices were in, I threw the lid on, set it to low, and went about my evening. Every few hours, I took a peek to see if the apples had shrunk down. If there was room, I diced up another half dozen apples and stirred them in. I continued adding until I had used up the entire half bushel. As soon as all your apples are added, you can ignore the sucka for the rest of the night.

In the morning, my kitchen smelled like apple magic and happiness. For real. The apples were super soft and ready for the stick blender. If you don't have a stick blender, I have heard of people using hand held mixers. At this point I suggest tasting it, and adding sugar and spices to suit your tastes. Immediately after I finished canning my batch, I happened upon a recipe that included vanilla extract. WHY didn't I think of that? I'm totally doing that next year.

The next step kinda depends on your crock pot. You want to get your puree up to a simmer. One of my crocks was simmering on low, while the other one had to be cranked up to high. Once it's simmering, you can take the lid off and let it cook down over the course of the day. Stir it every once in a while, or whenever you can't resist leaning over the pot to sniff the goodness. As soon as it is as thick as you like, you're done. Hot foods are always more runny than room temp or refrigerated, so it might help to scoop some on a plate and chill it. You can do this whenever you're curious. Or hungry.

I started simmering my apple butter about 9:00am and it was done about 4:00 in the afternoon. To make life easy, I decided to combine everything into my 7qt crock (it BARELY fit) and leave it be until the kids went to bed at 8:00. Next step: canning!

The link I incuded above gives very thorough canning instructions, so I will send you there for the details. Below are just my notes.

  • A half bushel of apples netted me 21 half-pint jars of apple butter, or approximately 5 1/2 quarts. I'm hoping this will last us a year!
  • From start to finish, the canning part of things took me about 4 hours, but I know I could pare that down quite a bit.
  •  I have two water bath canners, and when you're doing big batches like this it is AWESOME! It cut my processing time in half, although I think my poor stove wept for joy when I was done. Canners are huge!
  • I always forget how long it takes to bring the water to a boil initially. It must have taken close to 2 hours between the two of them. Factor that in if you want to start canning as soon as kids are asleep. You can have the water heating during the bedtime routine.
  • One HUGE canning tip I learned this time around, is to add a splash of vinegar to your canning water. Canners, especially the racks, will rust. Guaranteed.  Adding vinegar to the water works some mojo and not only prevents but REMOVES rust from the pot and rack! Be forewarned, if your rack is super rusty and you soak it in vinegar water, you will get all sorts of nasty floaty bits in the water. Better to give bad rust a soak before you use it to can.
I am REALLY impressed with how easy this was. I essentially spent two evenings on it, with a little stirring in between. The first evening was chopping apples, a job that can be done in front of the TV (or radio, if you're feeling old-timey). The second evening was the canning, but considering it was only four hours (and most of that waiting for water to boil), there was very little work involved. Very few actual hours invested, and I now have a year's worth of sweet apple butter. I'd love to try it in baking, but for that I may have to make another batch. These jars are going to be as closely guarded as my spiced blueberry jam!

(I know, it's cruel to do an apple butter post without showing apple butter. But since I can't find my camera I'm going to post this now and update with a few beauty shots later.)

Friday, November 9, 2012

Garden Recap 2012

Not my 'maters. Image Credit
This year I managed to clear a little 4'x8' patch in the backyard, and in it I crammed four Roma tomatoes, three jalapenos, three sweet frying peppers, and four cabbages. Yes, they all somehow fit. The cabbage ended up a bust, because I planted them late and they were devoured by some little buggy.

Only parts of it managed to get 6-7 hours of full sun, but somehow my little patch of tomatoes and peppers did phenomenal! That is, until they got walloped by a nasty combo of septoria leaf spot and late blight. I didn't notice it until it had gotten a strong foothold, and I was reluctant to spray heavy pesticides on them. It's a shame, too, because my Romas were absolutely covered in tomatoes! Once the blight got to them, it was over. Unripe tomatoes were falling off the vine daily, and whatever managed to hang on was covered in blight spots. I did get enough good fruit to try several batches of fermented salsa. That was interesting. I'm still getting the hang of fermenting. Most of my attempts have worked out well, but many of them are too salty for me to enjoy. The salsa wasn't too bad though, and I think I'd try it again if I had the chance. It was far less effort than canning!

My peppers fared better than the tomatoes against the spot/blight combo. To my surprise, the blight didn't cross over until very late in the season. There was very little effect on production, thank goodness, but I had no idea how many jalapenos I could get from three plants! WOW! I only wish I had been more prepared for the harvest, because most of it ended up sitting in my kitchen until it went bad.  I did make a small batch of candied jalapenos (also called cowboy candy!) and those turned out really good! It's horribly full of refined sugar, but the syrup is my favorite part. Sweet and hot, it's awesome on burgers or even salads! I definitely want to try that again next year! Assuming I get my butt organized in time...

I think my plants did well in their plot for two main reasons:
1) I fertilized them weekly for the first half of the season (non organic. sorry), and kept them reasonably well watered despite a very dry, hot first half of the summer.
2) The full sun lasted until early afternoon, effectively shading the plants during the hottest part of the day. Normally that would be a problem, and I think it was part of my blight problem during the wet second half of the season, but for our unusually hot, dry early summer it was exactly what they needed.

The worst part of all this, is thanks to the intense leaf spot and blight, I will not be able to plant tomatoes or peppers in my plot for at least three years. To add insult to injury, a few scraggly pepper plants that I had planted out front also came down with blight, so I have no place to plant tomatoes in-ground without digging up a new plot. Nuts.

So what have I learned this past year? First, if I'm going to grow something, I had better be prepared with half a dozen different ways to use up the harvest, and at LEAST one that requires little or no effort. Wasting produce is to have wasted every minute and every dollar spent on gardening. Second, I need to make sure I inspect my plants regularly. If I had kept a closer eye on my tomatoes I might have caught and eliminated the blight before it wrecked my plants and poisoned my soil.

I have already thought a lot about the past year and how I want to improve, but that will have to wait until my next post. Yep, I'm already planning next year's garden. What can I say, I'm a committed planner!

Monday, September 24, 2012

Cauliflower Beef Soup


I'm going mad with soup making right now. As fast as I can whip up a batch of broth it disappears into a flavorful soup. This one is fairly understated, but I left it that way on purpose. I could have easily used more onion or rosemary, but this version has just enough to taste good and leave the hearty beef front and center. Feel free to add stuff to your heart's content!

Speaking of rosemary, I think everyone should grow it! My head explodes with happy every time I run my hands through the branches and inhale the intoxicating aroma. Think I'm exaggerating? Sneak into my yard and try it yourself. (just kidding, go away. I'm probably still in jammies) It is such an easygoing plant, and so far has tolerated hot, dry conditions as well as wet, humid conditions. The real test is to see if I can get it to live through the winter. Mine is in a pot and will have to be brought inside. I don't water plants so well... If it dies I can always strip the dried leaves off the branches and still have oodles of beautiful rosemary to grace my cooking.

Mmmmm, so good!

CAULIFLOWER BEEF SOUP     Yield: Approx. 3-4quarts

2 large cauliflower heads, woody stems removed and florets broken into large chunks
1/2 red onion, roughly chopped
1 4-inch branch of fresh rosemary
Dash of black pepper
1 - 1.5 quarts beef broth (this won't cover the florets but it will cook fine)
1 lb ground beef (I used grassfed beef from my friendly local farmers at Spring Valley Farms. Love those guys!)

Simmer everything until the florets begin to break down as you stir. Using a stick blender or a regular blender, blend everything until smooth. Some florets will mock you and refuse to be pureed. Don't fight it. Give them the stink eye and move on. The beef will add enough texture that you won't be bothered by the occasional cauliflower chunk. If the soup is thicker than you like, now is the time to add more broth. Place the pot back on the stove. Drop little balls of ground beef in the soup and bring everything to a simmer. Do not stir until the meatballs are cooked through! They could break apart and ruin the coolness. This freezes fabulously!

Thursday, September 20, 2012

Laundry Soap is Dope


Here is another overdue project from my Personal Challenge 2011. Better late than never!


Homemade laundry soap is pretty stinkin’ popular anymore, with half of people saying it works as well as Tide, and the other half saying it’s a waste of time. I used a pretty standard recipe:
1 cup Borax
1 cup washing soda
2 cups soap shavings*

I just grate up the soap, stir in the Borax and soda, and call it a day. Easiest stuff ever. Lots of people swear by the liquid version, but I just can’t be bothered. Plus, from what I’ve read, it’s a bit trickier to get the proper consistency. With the powdered stuff I just toss about 2 Tablespoons to a large load of laundry. I also keep a 50/50 mix of borax and washing soda on hand for really grimy loads. I like to put the soap in first, run some hot water on it for a few seconds to speed up the dissolving process, and then after I load the washer with clothes I switch back to cold water. Seems to be working fine for me! Can’t say that it works worse than any other brand I’ve used, and I’ve found I don’t really miss all the fragrances (ok, sometimes).

So far I’ve used Fels Naptha laundry bar soap, Zote laundry bar soap, and Kirk’s Castile bar soap. I think they all work about the same, but I don’t care for the ingredients or smell of the Fels Naptha or Zote. Both knock me on my ass when I'm grating them up, and I don't care to stand too close to the container when I scoop it out, either. (The scent is extremely faint in the clean clothes, thankfully) Kirk’s is about as close to old-fashioned lye soap as I have been able to find in stores, but I suspect it would leave a residue on the clothes over the long term.The two laundry bars are meant to wash away cleanly, while body soap is typically designed to leave a fine layer of glycerin or other skin softening substance behind. Sometime this winter I want to try making my own laundry soap from lard and lye, just for the comparison. I really can't settle on which I prefer, so for now I just bounce back and forth.

Action shot! WEEEE!

Oh, and I rock a Downy ball full of white vinegar as my "fabric softener." It normalizes the ph of the clothes after all that washing soda, and adds to the disinfecting power. I have never smelled the vinegar on the clothes when doing it this way, and my towels are reasonably soft.

*A note on measuring soap shavings. This has to be the most confusing part of all the laundry soap recipes floating around the internet. Many recipes only specify "1 bar," however the popularly used soaps vary quite a bit in size! The gold standard, Fels Naptha, is 7oz, while Kirk's is 5oz, and Zote is a whopping 14oz! Ivory, another popular choice, is 4 or 5 ounces. BUT, there's an additional problem to just the bar size. Some of them contain a lot more water than others. In my experience, Zote is a REALLY soft soap. It can be a mess to try and grate. Out of curiosity, I grated up a bar and let the shavings dry out for a month. (or two... I forgot it was there!) The difference in weight was amazing. A completely dried out bar of Zote was close to 10oz! The volume of shavings also dropped A LOT!  That would make a big difference when measuring soap by the bar or cup! It's really no wonder the results can be so varied with the same recipe. What we need is a way to make this predictable with every batch.

That little red line marks how much soap I started with. Crazy, right?

In the future, I plan on grating and drying out a new bar of soap long before I need it, and then measuring equal amounts soap, borax, and washing soda by volume. If your shavings are large, you may have to put the soap and some of the washing soda in a food processor to break it down further. This helps to keep everything evenly distributed. I recommend throwing a hand towel over the machine, as there will be a small cloud of soap dust and it will make you want to gag.

Having said all that, I must admit that I don’t use homemade stuff for all my laundry. I used Ecos free and clear for cloth diapers (although I no longer CD, thanks to ammonia issues). My musty summer towels and nasty kitchen washcloths never got fully clean with Ecos. The smell would cling, or reappear with a vengeance as soon as the washcloth got wet. After one wash with double strength homemade soap, the smell was GONE! I am impressed. I need to re-test the hubby's workout clothes to make a final decision. I used to keep a small bottle of original Tide handy for big cleaning jobs, but not anymore. I'm too cheap. Man-smell is almost impossible to kill without the enzymes in Tide, so workout clothes will be my ultimate test.

Anyone else use homemade laundry soap? What kinds of bar soap have you used and which do you like best? I really can't decide and it's driving me nuts!

UPDATE 2013: I pretty much stick with Fels Naptha for convenience. I let the bar air dry for at least a month before grating. This will give you nice, fine shavings that will stay evenly distributed throughout the mix. I no longer bother running hot water on the soap before loading clothes, it doesn't seem to make a difference. My current "recipe" is equal parts dried soap shavings, borax, and washing soda; occasionally I will add Oxyclean (usually generic) if I have it on hand, same proportions as the rest. I still use 2Tbsp per load. Try it, you'll like it!