Wednesday, May 30, 2012

Balsamic Pickled Asparagus


I know, this is rather late in the season for asparagus, but think of it as being prepared for next spring! I made these on the same day that I canned all my marmalades, but for some reason I never got around to posting about it.

Asparagus seems to be one of those "love it or hate it" veggies. For some people, its more of a "love it now, hate it later" veg. Don't ask why. It's awkward. Me, I'm a "love it now, pretend I don't mind later" gal. True to my current (but slightly less fervent, thanks to impatience) commitment to preserving foods in season, I decided to see if there was a way to preserve asparagus during the brief time that it enters the "reasonably affordable" stage. Asparagus out of season is crazy expensive!

Since asparagus is a low-acid food and I don't have a pressure canner, the only way I was going to be able to can them is by making pickles or jelly. Asparagus jelly doesn't sound particularly appealing. Pickles it is!

Whilst perusing the interwebz, I found this recipe from My Pantry Shelf. A pickled asparagus recipe that calls for lemons? How convenient! I just happened to be inundated with lemons! Plus, the jars looked gorgeous with the bright green asparagus and perky yellow lemons. This I gotta try!

Right about now, you might be wondering why my pictures look nothing like those for the original recipe. I'll tell ya why. I did a no-no. I changed a canning recipe. This is Cardinal Rule #1 in canning land. You're supposed to ONLY use USDA approved recipes, and NEVER alter them. Don't get me wrong, there is a real science to preserving food to make it safe, especially when using the water bath canning method. BUT, we're talking pickles right now. Pickles rely on large quantities of vinegar to acidify the recipe, making it impossible for botulism spores to grow.

The only change I made to the recipe was to sub some balsamic vinegar for the white vinegar. I did this because I'm not actually a big fan of pickles. Oh I like them every once in a while, but most homemade pickles have disinterested me. I decided that if I was going to go through the trouble of canning up asparagus, I needed to make it something I would actually eat (not to mention something worth using asparagus instead of cukes). Balsamic vinegar goes fabulously with asparagus. It also happens to be my favorite cooking vinegar, and you'll (hopefully) be seeing several other recipes on here that feature it.

Why do I feel the alteration was safe? Because Rule #1 in pickling is do NOT monkey with the acidity level. My white vinegar has a 5% acidity level. According to my bottle of balsamic, it has an acidity level of 6%. Instead of lowering the acidity, the switch would actually INCREASE it. So that's why I didn't feel bad about changing the recipe. I've eaten 2.5 of the jars (by myself, thankyouverymuch) in the two months since I made them, and so far there are no signs of spoilage or off-flavors.

The one down side, of course, is the dark balsamic ruins the beautiful lemon-asparagus look of the jars. I don't mind too much. I'd rather have ugly food that tastes amazing, than have a shelf full of pretty doorstops.

Ok, on to the recipe! Since my modification is so minor, I'm only going to give you my ingredient list and then send you back to the original post for canning instructions. That, and I'm too lazy to type it all up. I need to do something about that.


Balsamic Pickled Asparagus

3lbs asparagus
1 1/2c distilled white vinegar
1c balsamic vinegar (make sure it's at least 5% acidity)
2 1/2c water
2 1/2 tsp pickling salt (I used kosher sea salt)
3 tsp mustard seed
6 cloves garlic, peeled
1 lemon, sliced

See My Pantry Shelf for canning instructions. I had plenty of extra pickling liquid after filling up the jars of spear tips, so for kicks I filled a jar with the trimmed asparagus ends. Not the woody parts, although I plan to try them out too, but the fresh bits that were sacrificed so the tips would fit. I have to say, they were every bit as good as the tips, if not as pretty. I'll definitely do that again, as wasting good asparagus is just plan wrong.

 I recommend letting these sit for at least two weeks to mellow. The first jar I opened was kick-your-rear strong in the vinegar department. Two months later they are nice and gently tangy. These would be great on a crudite tray, or wrapped in salami as an appetizer. Or, y'know, eaten straight from the jar, as I like 'em.

Saturday, May 19, 2012

Spring Preserving, Part 2: Preserved Lemons


After canning the marmalades, I was still drowning in lemons and grapefruits. I realized I was going to have to get creative, and quick!

Other than marmalade, the only other recipe that I came across featuring lemons was called (drumroll please...) Preserved Lemons! I know, clever. It's essentially lemons preserved in gobs of salt, and is a mainstay of Moroccan cuisine. I danced around the idea for quite a while before giving it a try. After all, what do I do with salty lemons? I don't have any interest in Moroccan food. But, with a huge bowl of lemons calling to me, I figured what the heck.

There's no rocket science to this. Many recipes have you keep the lemons whole, but I sliced them into 6 sections. The rind is primarily used, so I figured I would be more likely to use it if it was easier to cut up, and in smaller portions. Once your lemons are all sliced, dump a lot of salt into a jar. Then add a layer of lemons. Then add another gob of salt. Then lemons, then salt, etc., ending with salt. When you get to the top of the jar, press down hard on the lemons until they start releasing their juice. You want to make sure the lemons are completely covered by the salty liquid. (Once again, you don't want to do this if you have any cuts on your hands. Unless you're a kitchen badass. Or just a masochist.) If your lemons don't release enough juice to cover them completely, add the juice of another lemon (or the bottled stuff, no shame in it) until you have enough. Now cap your jar and let it sit at room temperature for up to a week before moving it to the fridge.

When I made these, I followed the typically prescribed method of giving the jar a shake every now and again while it sat out. Thanks to my dependable forgetfulness, my jar sat out way longer than a week. After the first week, I tasted the rind and was surprised by how much I liked it! While it is a bit salty, the fresh lemon taste is completely preserved. I added a finely diced rind to a salad and loved the burst of flavor. I decided this was definitely a condiment I wanted chillin' in my fridge for spontaneous cooking experiments.

Unfortunately, after what was probably more than two weeks at room temp, my jar went from a bright lemon scent to... not so bright. Perhaps my lemons weren't well scrubbed before brining, or perhaps the fork I used to remove a rind was not clean enough, or some other variable I can't think of. Given the sheer quantity of salt I added, it's a miracle anything managed to grow in there!

[Um, Maria, if you look at your own picture, your lemons are CLEARLY not covered in lemon juice. Maybe THAT was your problem, Genius! And why the heck didn't you put them in the fridge after tasting them the FIRST time? You're not the brightest crayon in the box, are you?]

I hate when I yell at me, it's so degrading.

Either way, these went from yum to yuck and I had to dump the whole jar. Swallow sadness. I want to try this again, but next time make sure everything is sterile. Also, instead of shaking the jar regularly, which shouldn't be necessary if everything's well covered by juice, I may try adding a layer of olive oil to the top. That ought to seal out air pretty well. I'm trying to brine the lemons, not ferment them, after all! I read this tip on the blog mybissim.com and it's worth a try!

Sunday, May 6, 2012

Six Dollar Succulents


My dear friend had her bridal shower on Cinco de Mayo, and in honor of all things enchilada, we were given these adorable succulents in tomato sauce cans. Aren't they CUTE?! My friend has a pretty clever sister. After the shower there were quite a few extra plants. I have no shame in admitting that I snagged as many of those bad boys as I could without looking too crazy. It's ok though, I gave the bride waffles.

After getting them home, I did a little research on succulents. God bless Google. How did our parents learn anything back in the Dark Ages before internet searches? It seems succulents are pretty laid back plants, so long as you cover a few basic needs.
  1. The soil needs to be very light and drain easily, and the pot MUST have drainage holes. Wet roots for too long will kill the plant dead.
  2. Let the soil dry out between waterings. Like, completely dry, if you want. Heh, this is how I've been watering my ivy plant for years. The fat leaves on succulents store water, so as long as the leaves feel firm it shouldn't need to be watered. (EDIT: This is LIES! Smaller leaved plants can't store as much water as the big boys, so if you mix sizes in a planting, you have to cater to the little guys. I learned this the hard way and lost two out of the four plants. Just water once a week or so and they'll be fine, but soft leaves are bad. Letting your one year old re-pot them while you're not looking is also bad. That's how I lost a third. I'm down to just the sturdy guy on the far left of the picture.)
  3. Any plant that looks this awesome needs to be in an equally awesome pot. Yes, this is an official rule. That I made up. I have that kind of power.
Now, as much as I love the look of the tomato sauce cans, I didn't think I could leave the plants in there for very long.  The soil was regular potting soil, which hangs on to water like a sponge. I was also concerned about the can rusting on my window sill. Since I have various pots and whatnot all over my house, I decided to use something I already had on hand. No point in buying ONE MORE POT when I have at least a dozen empty pots floating around.

The first thing to catch my eye was this. Know what it is?


That's right! NOT a planter! All the pots I have, and I pounce on this thing. It's a clear plastic thingy that you're supposed to put over the square tissue boxes. Turn it upside down, and you have a clear planter with a ginormous drainage hole! I was given this at my bridal shower almost 4 years ago and never used it. Don't ask me why I kept it. I keep everything.

In order to make it into a planter for the succulents I was going to need to block up the hole enough that soil wouldn't wash out. I also needed an appropriate soil mix for the plants to grow in. I could have bought the "cactus mix" potting soil at my local wally world, but my Googling skillz informed me that it was pretty much regular, peat-based potting soil mixed with sand and perlite. I already have the potting soil and sand, so I decided to just buy a bag of perlite. Same price as the bag of cactus mix, but now I can make special soil mixes in the future. My soil mix was:
  • 1 part potting soil
  • 1 part perlite
  • 1 part sand
A note on sand: I got my sand a while ago from Lowe's for $4. It was labeled 'leveling sand" and was way heavier than it looked. Don't be the chump that thinks they can pick up a bag of sand. Let the muscly guys do that for you and save your dignity. Make sure your bag doesn't contain anything other than sand (some may contain concrete. you'll regret that one quick). Also, watch out for sand that contains a lot of salt. Salt will burn the roots and kill the plant dead. DEAD, I tell ya.

How can you tell if the sand is salty? Take some salt in you hand, check to see if anyone is looking, and lick it. Do it. I double dog dare ya. Ok, ok, it's kinda gross, but I couldn't think of a better way to check. Unfortunately, I didn't think about salty sand until after I finished the project. I'm going to try flushing the pot well with plain water, and then again with water and a touch of vinegar, just to be on the safe side. (see THIS article for more detail)


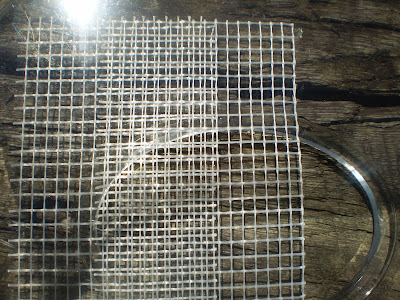
Now that I have my soil, I need to prep my pot. Whilst perusing my beloved Dollar Tree, I found a roll of fiberglass mesh tape, the kind used to patch drywall. Genius! On the way out I also snagged a bag of decorative river rocks. Because I have no self control in this store. Everything is actually a DOLLAR, for crying out loud! I love this place! (I even worked there one holiday season, but that's a different story)  I used the mesh tape in strips, overlapping them and staggering them slightly to make the holes even smaller. We're trying to hold back sand, after all.


I covered the hole with probably a dozen strips, leaving plenty of hangover to help hold it in place. Because of the size and location of the hole, the tape is supporting quite a bit of weight. I could have used more tape than I did.


I used a little over half the river rock in the bottom of my new "pot." Then I filled it with soil and planted my little succulents into their new home. I sprinkled the remaining rocks around the top and stepped back to admire my awesomeness.


So that was $4 for the perlite, $1 for the rocks, and $1 for the mesh tape. I now have a trendy little succulent arraignment for $6! AND, I don't have to look at a stupid, useless tissue box thingy and wonder why I still have it! The happiness could kill me DEAD!


Saturday, May 5, 2012

Spring Preserving, Part 1: Marmalade!


Way back in February I mentioned that citrus was in season and on sale. I also happened to mention that I was obsessed with the thought of preserving in-season foods. What I didn't mention was what I planned to do with it. That's because I had no clue what to do with it! Other than eating grapefruit for breakfast (and still being hungry) and juicing or zesting the lemons for cooking, I had very little experience with citrus fruits. See, that's the funny part about preserving foods. Unless you know how to use the stuff in your everyday meals, you could end up with entire basements of pretty jars that serve you no purpose. I try to come up with several ways to use a given end product before deciding to go through the effort and expense of making it, and even then I only make a small batch to see how I like it. I can always make a bigger batch next year, when I will be fully prepared for the season's bounty.

It was really tough to settle on a recipe for the citrus. The vast majority of preserves were in the form of marmalade, which I have never eaten and heard mixed opinions of. Marmalade is like a jam except that it is usually made with sour citrus and often contains the bits of zest and pulp. After an exhaustive search, I finally decided to throw caution to the wind and make two different kinds of marmalade. (I did end up making two other recipes with the citrus, which I'll talk about in Part 2!)


The first recipe I tried was Pink Grapefruit & Cranberry Marmalade from italianfoodforever.com (you can find the recipe HERE). During the holidays I had compulsively purchased a bag of fresh cranberries without a single idea on what to do with them. This recipe ended up being the perfect way to clean out the freezer! The recipe calls for 5 cups of fresh cranberries, but my little bag only contained about 3. I wish I had made notes, because I can't remember if I halved the recipe or not. I'm pretty sure I did. I do remember that it was WAY too tart for me, and I added an extra cup of sugar. After tasting the final product I wish I had added even more sugar. One of the benefits to this recipe is that it didn't require any pectin to set up into a firm jam consistency. Cranberries have oodles of natural pectin, and the long boiling puts nature to work for you. A tip on prepping the grapefruit: it's incredibly easy to zest them with a vegetable peeler and then dice the large strips into fine pieces. They don't break down while cooking, so the smaller/thinner the better! Be sure to dice the grapefruit flesh small because it also doesn't break down. I almost considered fishing out all the grapefruit chunks and dicing them smaller, but by then I was tired and ready to be done!


I had some extra marmalade that didn't fill a canning jar, so I poured it into an old jelly jar and popped it in the fridge. The final verdict? Not bad! It's still way too tart for me to enjoy it as a sweet condiment, but I could see myself using this as a filling in a chocolate layer cake or on pork. I have a much-loved recipe for Cranberry Mustard Pork Chops that I will have to try with the marmalade. All said, I'm not sure I'll make it again. It will all depend on how I use this batch through the year.

Also, when chopping up buckets of citrus, for the love of all that's good and holy, do NOT cut your finger or get a paper cut. Trust me. It's just bad.


Next up was Honey Lemon Marmalade, from foodinjars.com (you can find the recipe HERE). I followed the recipe exactly, except that I zested the lemons and removed most of the white pith, in the same way I did the grapefruit. I used Ball brand liquid pectin because it was significantly cheaper than Certo, but it caused about 48 hours of misery and worry because I thought it wasn't going to set up. After a few days though, it set up nice and firm. This stuff tastes AMAZING. I was most exited to try this recipe, and it did not disappoint! It would be incredible over a dessert, a morning scone, or even pancakes. Very bright and lemony, with the soft taste of honey in the background. When I make it again, I think I'm going to try straining a batch right before adding the pectin. I think this would be fabulous in a cup of tea, but the bits of rind and pulp would annoy me. A smooth jelly would be divine for tea!


This was also my first try at canning food. Everything went surprisingly well, but I have to admit to being absolutely terrified to open my jars and taste them. This is very weird for me. I am generally a laid back, germs-are-good-for-ya kinda gal, but the threat of botulism keeps scaring me away. I can't shake the nagging concern that I might have overlooked something. I have tasted my canned asparagus that I made the same day, but for some reason I'm afraid of my marmalade! Ah well, I still have plenty of both flavors in my fridge. Maybe by time those are gone I will have conquered my fear.

Stay tuned for Spring Preserving Part 2!